


7 Steps Guide on How to Make Driftwood Art
How to make driftwood art? This is probably what we’re looking for when we want a customized art for the walls of our home without spending a fortune.
If you’re looking for a coastal or rustic feel, driftwood is the right material to go for!
With some creativity, the driftwood art can look totally jaw-dropping. In fact, it might even stun every guests that come by to visit your house!
This is a step-by-step guide that will help to get you started!
Table of Contents
1. Think of where to decorate with you driftwood art
You can skip to step 3 if you have an idea on what art to make with the driftwood 🙂
You can make an amazing driftwood art but at the end of it, you need a good spot to put it up! The best way to figure this out is to actually identify which part of the house that you want to decorate. Work it out backwards so you can decide what kind of driftwood art to make.
It can be a blank wall by the kitchen or the toilet wall. Maybe you have a spot on the shelf that has been empty for quite some time. Perhaps, you can create a driftwood sculpture that could fill in the space?

Maybe you have a piece of mirror on the wall that just looks plain. Would it be nice to decorate it with some driftwood? The same goes for planters, picture frame and anything that you can think of.

Or perhaps you need something functional such as a table lamp or a bowl. Yes, you can make those with driftwood as well!

a) decide on the size of the driftwood art
Knowing where to put your art is a crucial step as it will also define the size of the piece of driftwood art that you will be making. You don’t want it to be too small or too big to fill in that space.
Ultimately, this will also help you decide what kind of art style that you will want to create out of those driftwood.
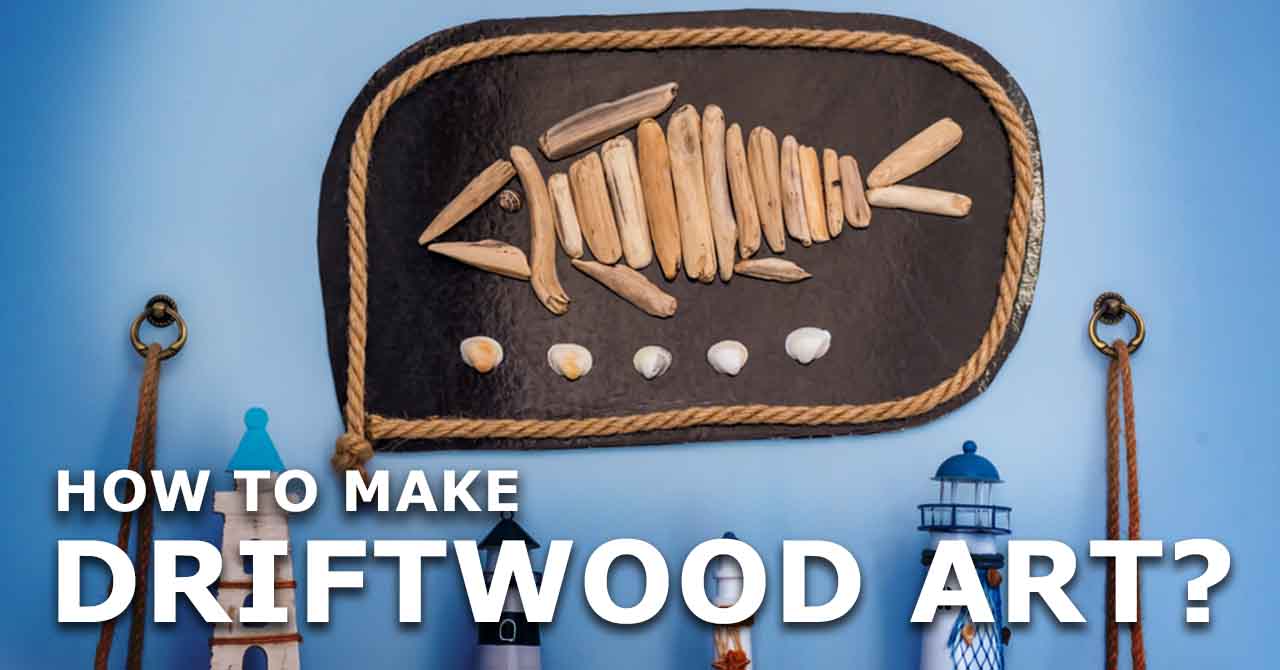
There’s tons of ideas to go for like sculpture of a fish, a ball, hexagonal wall art, making wordings out of it and more.
Say you want to make one for the entry way. you wouldn’t want to make anything that will get in the way. A flat design such as driftwood seahorse or wreath would be nice.
b) setting the display strategy of your art
Once you know where to put up your driftwood craft, the next thing to figure out is the display method.
Putting on the shelf is the easiest as you don’t need any extra tools.
However, if you’re thinking of hanging it on the wall, you need to get the right hooks and hanger that will fit the job. This also means that your driftwood art needs to have a special features for these hooks.
2. Find ideas for your driftwood art design
This is the most fun part on how to make your driftwood art! Time to browse online for inspiration! Choosing the idea is the exciting part of the process but it can be overwhelming because there are tons of mindblowing ideas out there!
As a reminder, take into consideration of all those factors that you have figured out in the first step – the location, the size, bulkiness and display strategy.
a) brainstorm a driftwood art design idea
There are a lot of ways to go about choosing the driftwood design. One is by following your passion. Let’s say you love the beach. Creating a driftwood sculpture in the shape of a crab or anchor would be a cool idea.
Or maybe hiking is your thing. Then, driftwood sculpture of lizards or mountain landscape will be amazing. It displays both your interests and adds some personality into your home.

Sometimes, you just want to put up a message. For example, the word “love”. You want your house to exude a positive love vibe. There you go, you can make a driftwood wordings and put it somewhere in the living room.
There’s no right or wrong way to generate the idea for your craft. You can even surf the Internet for various driftwood ideas and imitate them for your project.
b) customize your driftwood art idea
Once you decided on an idea, try to imagine how the art looks on your wall on anywhere you wish to put it. Think of anything extra that you may want to add.
Would it look better with string lights and make it the perfect driftwood Christmas tree? Would you need to wrap it with faux vines to deliver a better visual effect?

You can add more things into your craft instead of using only driftwood. Consider painting it to give it an elegant look or finish.
Ideally, you want to customize it to suit the overall look and feel of your interior. Blend it with your existing accent of your room or living space.
Say you have an apartment with wooden floorings and light pink walls. Having a brownish driftwood art piece on the wall can be a little bit odd.
Instead, paint it white. White color would usually suit the pink wall very well.
3. Gather the materials
With your ideas all set in mind, it’s time to put your plans into action! Time to gather the equipment and materials that we need!
In this guide, we won’t be covering those heavy duty driftwood crafts that require drilling holes and putting in wooden dowels. Those are some massive project that needs heavy duty hardware!
We will just be covering the essentials of a lighter craft. Which are those that only use glue as adhesives and nail gun at most.
Here, we list out all the possible things that you may need for your craft:
- driftwood
- adhesives
- craft wire
- nail gun
- base board
- double-sided tape – for hanging light arts
- hooks and hangers – for hanging heavier crafts
- extras (string light, faux vine, spray paint, creme wax)
Driftwood
The base material that we need. You can either collect it somewhere or buy it online. Considering that we want it for the cheap, gathering it is probably the best way.

The amount and size of the driftwood that you need should be more than enough. Once you get started, you don’t want to be stuck with the problem of not having enough driftwood pieces.
For this, you might need a rough estimation on this if you’re going out to collect them.
If you want to save all the hassle of collecting, you can buy the driftwood pieces on Amazon. Some driftwood art ideas require certain pieces like a hollow log that can be hard to find in nature. Buying them online would save some time.
Adhesives
A good adhesive needs to keep the driftwoods together. For that, we would recommend Gorilla Super Glue Gel from Amazon. The traditional hot glue gun is not exactly recommended as it is not as strong as Gorilla glue.

Note that if you’re using larger pieces of driftwood, you might need to secure it to a base board with a nail gun instead of relying on adhesives alone.
Craft wire
Craft wire is best to secure your driftwood sculpture together. This is necessary for that extra security when working with large and heavy pieces of driftwood.
Get your craft wire from Amazon.
Nail gun
You will need to use this instead of adhesives if you’re working with big pieces of driftwood on a base board. The glue can be used to put everything together on the first round. After that, it’s best to nail it to keep it in place
The last thing we want is to have our driftwood craft falling apart.
Base board
Some driftwood art projects needs a base for you to work on. A base board serve as the canvas for your craft. It can also provide extra support that will hold your art together.
It’s also easier to work with heavier piece of driftwood
We would like to suggest MDF board or wood sheet as the base board. You can also upcycle other materials such as table top or even the door of an old cabinet.
MDF board is thicker and some comes in round shape which is perfect if your project needs it. Meanwhile, wood sheet can be thinner and lighter which makes it easier to hang later on.
Checkout Amazon for wood sheets and MDF boards.
Double-sided mounting tape for wall decor
Some flat and light driftwood craft can be supported with just double-sided tape. A good tape would be able to hold the weight of the craft and can be removed from the wall without causing wall damage.
Check out this double-sided heavy duty tape from Amazon.
4. Clean driftwood for your art
If you’re collecting your own driftwood, then you have to clean them. Here’s how:
- Remove dirt and debris with a small brush.
- Use sand paper to remove the bark.
- Rinse the wood to get rid of the mud. Hold it under a stream of water until it’s clean.
- Soak them in a gallon of water with 2 cups of bleach for about 15 minutes. Bleach will kill off any bacteria and cleanse it. Be sure it’s all submerged. Weigh them down with rocks if have to.
- Let it dry completely for 1 or 2 weeks. You also can bake it at at 200 degrees for about 2 to 3 hours to quicken the drying process. Watch closely to make sure it doesn’t burn.
5. Build your driftwood art
Now, it’s time to make your driftwood art! Different art will require different strategies.
Say you want to make a ball-shaped driftwood. You need a frame for it. In this case, you can use a beach ball. Glue the driftwood pieces around it and when you’re done, deflate it and extract the beach ball out.

Or, in the case that you want to create a hexagonal tile with driftwood pieces, you need to have hexagon-shaped wood sheets as the base. Then, glue the driftwood on top accordingly.

The fun part about creating art with driftwood is that you need a strategy to implement it. It’s like a puzzle piece and creativity is the only way to get your driftwood pieces take the form of art that you have in your mind.
6. Enhance the appearance of your art
Once you’re done building your art, the next step to do is to actually enhance it. But, if you’re happy with how it looks like? Then you can just put it up and enjoy the view!
In this section, the enhancement falls into two ways. One is to color it to suit the interiors of your house. Spray painting it will be the best instead of using a brush. It will save a lot of time!
The other is to add extra things such as fairy light, jute rope, seashells, fake moss or artificial vines that would make the craft looking stunning!

7. Put your driftwood art on display
Last and final step, is to put your art up! Take a pencil and ruler with water level to mark the wall surface.
This will be your indicator before drilling a hole on your wall for the hook. Make sure you really like the layout. There’s no turning back after you drilled a hole there!

Now you are equipped with the basic knowledge on how to make driftwood art! Think we missed any essential steps? Let us know in the comments!