


8 Steps Mason Jar Hydroponics – Ultimate Guide To Create Your Indoor Mason Jar Herb Garden

Mason jar hydroponics is probably one of the best productive ways to reuse your old mason jar. This is a gardening method with minimal budget and will minimal effort. Set every thing right one time and get ready to reap the benefits later!
It’s also an upcycling trend to be growing vegetables in mason jar all over the Internet. But, this is not about stuffing soil in, plant a seed then watch it grow. It’s a little bit different. We’re gonna cut our watering effort by creating mason jar hydroponics or also known as Kratky hydroponics!
This post will show you the thorough detailed step by step guide on how to create your own cheap hydroponics with mason jar.
Checkout this video to get an overview of mason jar hydroponics by Sam:
Now, let’s get into the details!
Hydroponics is a way to grow plants without using soil. So, it will get nutrients from the nutritive water instead. No soil also means no mess!

This idea is not limited to herbs. You can also apply this mason jar hydroponics for other vegetables such as lettuce, green onion, garlic and more.
Certain vegetables require certain methods of growing.
For example if you have green onions, keep the bulb end. This is the part that you will use to grow from.

Similarly goes to garlic. You could use the clove part and regrow it into garlic scallion.
As for lettuce you have to use its end. We usually cut off the leaves part for the cooking and leaving the end of it. So, this just conveniently suit our purpose to regrow it. We’re literally growing food out of vegetable scraps!
This post contains affiliate links. This means we get a certain amount of commission if you buy from our link with no added cost to your purchase.
What do you need to make your own mason jar hydroponics?
Our mason jar hydroponics kit consists of mason jar, net cup, liquid nutrition, grow medium and the plant of choice.
Table of Contents
1. Choosing the Container For Hydroponics
a) Mason jar

Just as the post title suggests, it’s a great idea to pick mason jar for various reasons. One is that they usually come in the form of sauce or pickle jars which we would buy as part of our ingredients. We don’t need to buy an exclusive container just for our gardening. That’s some money saved right there!
Plus, growing plants in mason jar is perfect as it doesn’t leak any harmful chemicals into the water or soil. Ideally, get the bigger sized ones. One huge advantage of this is that it can hold more water so you don’t have to bother to refill the water frequently.
Get your mason jar from Amazon.
Despite the ups, mason jar does come with one disadvantage. They’re usually transparent which means they allow light to go through. This could promote algae growth within the water in your jar.
These algae would not only take up the nutrients in the water itself but also grow uncontrollably. You will have to clean the jar frequently and that just beats the purpose of our project.
To avoid all this trouble, we have to paint the jar black. That will block the light from going through the jar. You can apply few layers of black gesso.
Gesso is a paint mixture that is coated on things such as wood and canvas to make the surface to have a bit of texture for acrylic paint to work well. Having that said, this also means that you can decorate the jar with acrylic paint later on as well if you want to. Hurray!
You can also use other method to put an opaque layer to the mason jar such as:
- taping it with a duct tape.
- wrapping it with a blackout cloth.
- wrapping it with aluminium foil.
- for more customization option, you can use chalkboard paint too. Chalkboard paint turns any surface into well, a chalkboard. Coat the mason jar with it and you’ll have a surface that you can decorate using colorful chalks!
- spraying it with black paint is not a bad choice as well. But you need to make sure it’s well coated and thick enough to block the light. After leaving it dry, you could spray another coat of metallic paint of your choice to give it an elegant finish.
- roll a thick layer of dark board into a cylindrical shape and slot it into your mason jar.

b) Plastic containers
You got that right! Plastic containers too can be used for our mason jar hydroponics project. One thing to note on is that not all plastic bottle is safe to be used.
That’s because most plastic will leach chemicals. These chemicals will seep into the water or soil and absorbed by the roots of the vegetables.
When we consume these veggies, we get these chemicals into our body as well. Good news is not all plastic is unsafe.

If you turn to the bottom of a plastic bottle, you will see a number inside the triangular recycling symbol. Generally, plastic number 2 or High-Density Polyethylene (HDPE) is considered to be safe for hydroponics.
They are known not to leach chemicals and is a popular choice to be used for gardening. Second choice to that is plastic number 5, polypropylene (PP).
For this plastic, hazardous materials are used in the making of it. Once formed it is not known to leach any chemicals.
However, its selection for gardening is vastly used. Hence, you will find most of the gardening pots sold out there is made of this plastic number 5.
2. Choosing a Net Pot or Mesh Pot
A net pot also known as a mesh pot is a container that has holes at the bottom. It is used to hold the grow medium as well as providing excellent feature for the nutrient solution to flow in and out. The vegetable roots will eventually grow out of these holes as time goes.
a) Reuse yogurt cups

For the choice of net pot, you can use yogurt cups, ice cream cups or sour cream cups. Just be sure the plastic used to make them is number 2 or 5.
You will also need to make sure that it fits into the mason jar just right. If it doesn’t, you might need to modify the net pot a bit before slotting it into the jar.
One way that I would like to use is to make some holes through the yogurt cup. Then, slot two wooden skewers right through it so that it works like a stretcher. Trim off the excess piece and put it into the jar.
The wooden skewer would allow the net cup to be hanging by the mouth of the mason jar.
b) Buy net pots

Save all the hassle of measuring your yogurt cup by buying the net pots from a local store. It doesn’t cost that much and it’s a worth while investment if you’re planning to build more mason jar hydroponics.
The only thing that you need to be aware is the size. Make sure it fits your mason jar.
3. Choosing Hydroponic Nutrients
The vegetables gets nutrients from the soil. In hydroponics, there’s no soil involved so the plant needs to get its nutrients from an alternative source – hydroponic nutrients. Depending on what we’re planning to grow, each plants require different ratio of nutrients as well as sunlight.
For lettuce, there’s the 8-15-36 fertilizer which is well mixed to have the right proportion of nitrogen, potassium and phosphorus needed for the veggie to grow healthily.
It’s best to get advice from your local gardener on choosing the right nutrition liquid for the vegetable that you choose to grow. There’s tons of mixture out there and it can be confusing for starters.
4. Choosing The Vegetable for Your Mason Jar Hydroponics
For beginners, you can pick lettuce, spinach or basil. They grow fast and is generally easier to manage. A typical mason jar hydroponic setup is good enough to cater their needs. If you’re growing massive vegetation like a tomato plant, you might need a larger setup with a larger mason jar.
There’s a difference in choosing to grow your vegetables from scraps or seeds. Growing the vegetables from scraps won’t produce large leafy greens compared to seeds. While seeds take longer time to grow, they do produce a more satisfying quantity of produce.
Gardening is about patience. And good things come to those who wait! It can take up to 100 days for the lettuce to be fully mature and ready for harvest depending on the variety.

Crisp head and Romaine lettuce takes the longest time to mature. As for other variety, they can be harvested pretty much any time in their growing period.
Basil takes about 75 days to mature. For spinach, it takes around 45 days to mature.
5. Choosing The Growing Medium
Growing medium is the substance in which your vegetable grows in. It’s the replacement to the soil and plays three main roles of providing physical support for the plant, allowing the roots to grow as well as supplying the roots with nutrients, air and water.
Choosing a medium can be intimidating for beginners. That’s because there’s a lot of choices to choose from. Here’s some of it:
- floral foam
- coconut fiber
- growstones
- rockwool
- oasis cube
- perlite
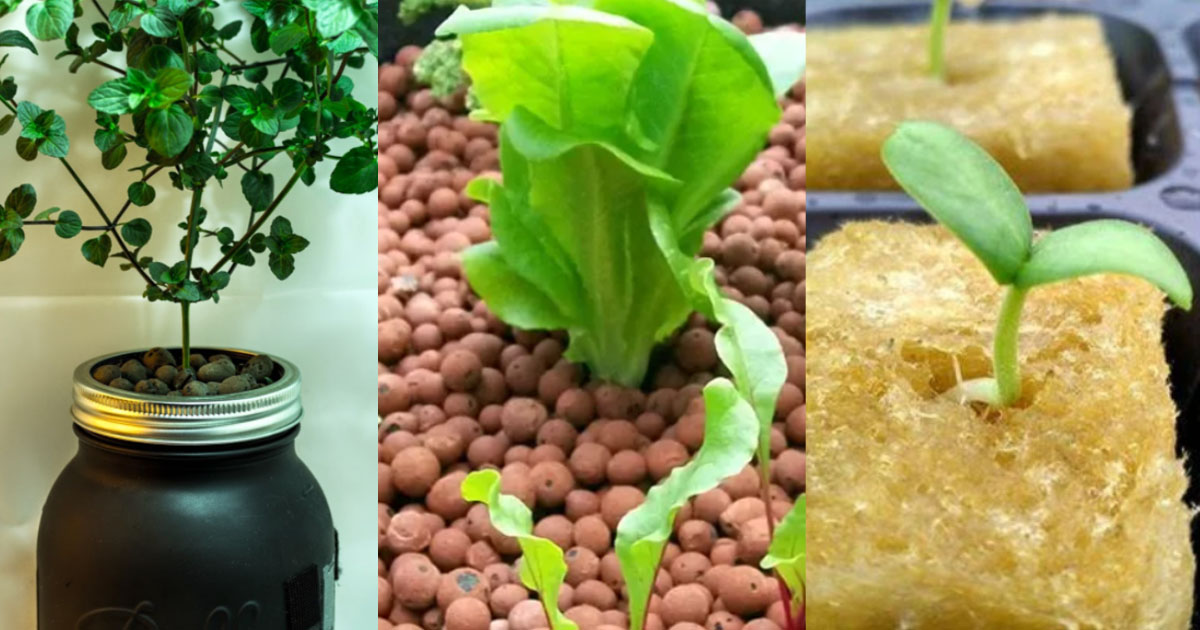
- hydroton also known as leca clay, clay pebbles or clay balls

For our mason jar hydroponics, we will be using hydroton mainly because it’s one of the most popular choice for several good reasons and also rockwool.
Hydroton are porous pebbles that absorbs moisture which includes the hydroponic nutrients.
The pores in them allows the air to keep circulating around your vegetable. You can also reuse them for a long period of time.
Rockwool is a natural material based fiber that is spun into cubes. They can hold water and aerate the seeds or rooting of the vegetable scraps incredibly well.
We will use a combination of both hydroton and rockwool.
6. Identifying Light Source
Plants need light to grow. Putting them by the window to soak up those sun rays is possibly the best choice. However, not all of us get to have sunshine coming through our window.
Sometimes it’s about the direction where the apartment is facing or being blocked by another tall building block.
In this case, we might have to buy grow light. This artificial lighting grants you the ability to grow a variety of plants throughout the year!
They’re designed to act like the sun, providing your plants the necessary spectrum of light for it to grow. Choosing the right grow light is another art of its own. It’s best to get advice from your local store for some recommendation.

Generally, you should leave the grow lights on for 12 to 16 hours for your plant. Then, another 8 hours of dark time for the plant’s natural growth cycle.
Simply put it, turn it on when you wake up from sleep and turn it off before bed. The plant needs light and darkness as close to nature as possible.
Get your grow light from Amazon.
7. Setting Up The Mason Jar Hydroponics
Now that you have all the pieces of the puzzle with you, it’s time to piece your mason jar garden into shape!
There are a few things that needs to be prepared few days before assembling your hydroponic jar – soaking the rockwool, soaking the hydroton and germinate the seeds.
a) Plant the seed in the rockwool

Assuming that you’re growing your garden from seeds, put it into the rockwool. Let it germinate at the side. Once it sprouts into a seedling, it’s ready for the next stage.
Generally, a seed needs water, air and the right temperature to germinate. Check the seed packet for the number of days that it will take for your seed to become sprout.
Don’t panic if it’s not sprouting after the specific days. There are several factors that could affect that. One is that the rockwool dried up and it didn’t get enough water which is a rare case considering how well the rockwool can retain water.
The other is probably because the seeds is spoiled. So, plant a few seeds in one rockwool for best outcome.
Make sure the rockwool is constantly moist for the seed to grow roots. The other is possibly because of bad seed. Plant few seeds at a time so you get to weed out the bad ones.
b) Soak the rockwool
The rockwool is alkaline due to the manufacturing process. Alkaline condition is usually not suitable for plant growth. So, you have to soak it in acidic solution until the pH value reaches around 5.5.
You can use a pH meter to measure. To make the water acidic, you can use distilled water with lemon juice.
Once the pH reaches to the favorable reading point, soak the rockwool in water for 24 hours.
c) Soak the hydroton
As you start to soak the rockwool, you can also do this. Soak the hydroton in water for 24 hours. It will absorb the moisture that your plants will need to grow.
Note that this will make the hydroton heavier but your plant can get the water from these clay pebbles with no extra effort!
d) Paint the mason jar
For this guide, we will be using the paint method to create an opaque layer that will block the sunlight. Remember to paint only outside the jar and all the way up to the lid.
The paint could have chemicals that could leach into the water. So, don’t paint the inside of the jar.
Apply several coating to make sure it’s thick enough. You will need several coating. Let it dry and hold it under the light. Try to see if you can spot any light coming through.
Apply more coating as necessary. After that, let it dry completely. Once you’re done, sterilize it with hot water.
e) Cut the yogurt cup with slits
Slice out some strips off the yogurt cup instead of poking it with holes. Slits will hold the rockwool just fine while allowing the roots to grow through with ease.
You can use a utility knife and cut the slits out with caution. Once that is done, soak it in hot water to sterilize it.
f) Mix the hydroponic nutrients
After getting the best advice from your local gardener on the nutrient liquid to use, now you need to mix it with the correct portion of water.
Put the net cup in. Fill the mason jar with the liquid until it’s about half an inch from the bottom of your yogurt cup or net cup. Don’t let your net cup to be fully submerged in your nutrient liquid or your sprout might drown.
g) Transfer the sprout into the mason jar
Put a layer of hydroton at the bottom of the net cup. Then, place the rockwool with the germinated sprout into it.
You might have to cut the rockwool into the shape that will fit into the net cup. Layer the top of the rockwool gently with more hydroton.
Make sure it covers the top so that no sunlight can get through the jar from the top opening.
h) Place the mason jar in the sunlight
This is pretty much the last step. Bask it with sunlight and wait for it to grow. You can check the water level every 2 weeks in a 1 liter mason jar.
Use a wooden skewer and poke through all the way to the bottom of the jar. Then pull it back up to check the water level.
You can mark the exterior of the mason jar with a marker parallel to the bottom of the net cup. This makes it easier for you to compare with the skewer to check water level. Refill as necessary.
That’s it! Your jar is set and you’re on your way to harvest fresh produce right from the comfort of your home!